To create an agreement select the Create Agreement button. A window similar to the below will then appear:
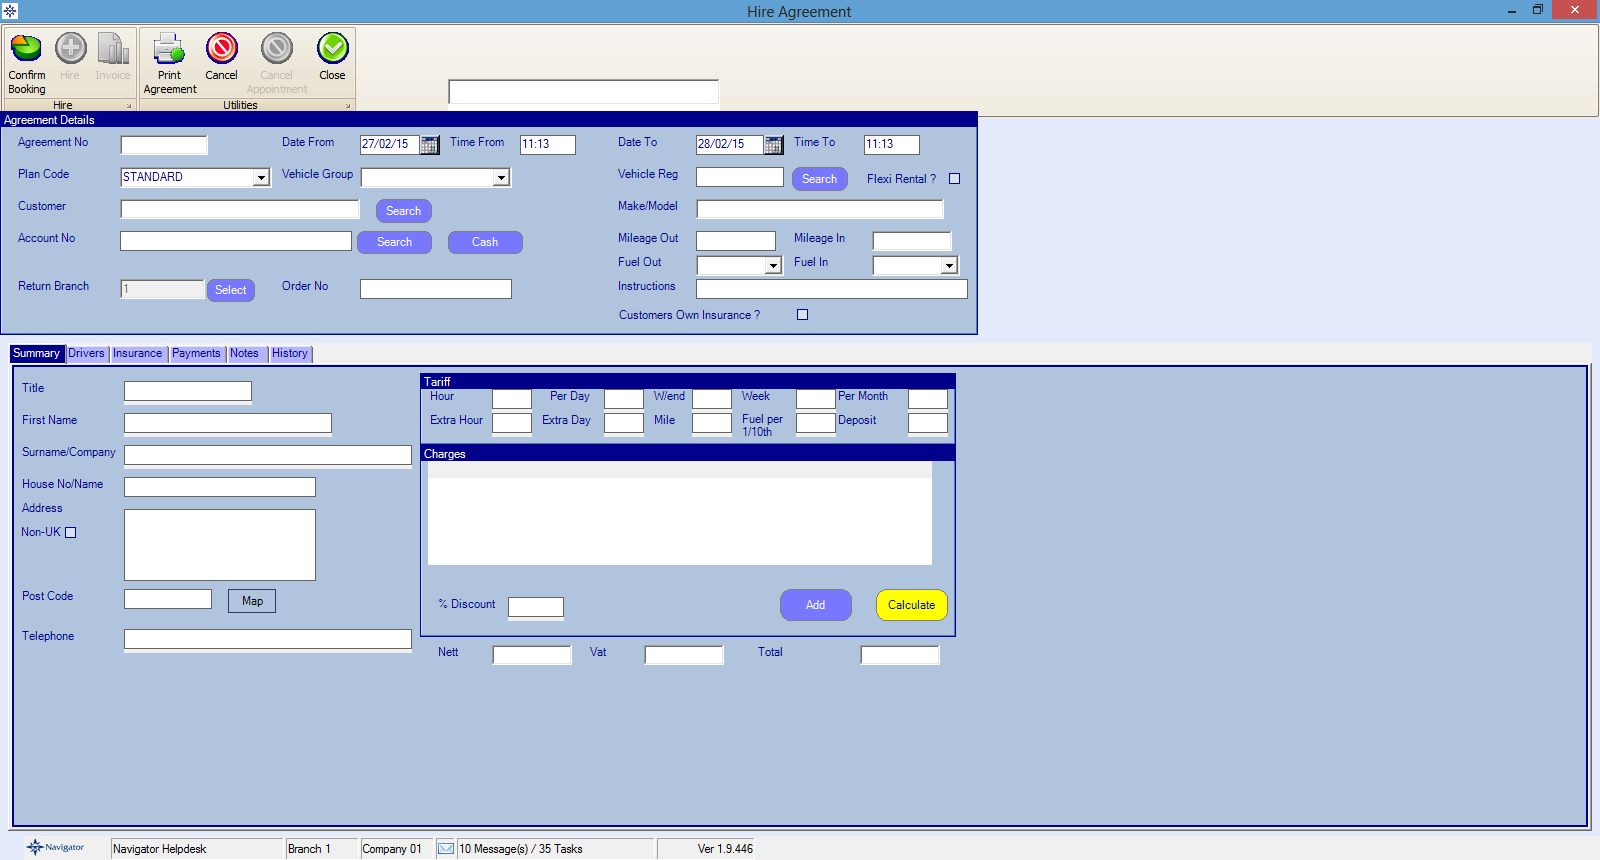
An agreement number will be automatically allocated.
To create a booking, the minimum details that can be entered are the Group of Vehicle (as created in the Rates table), the date from and to and the customer details including the telephone no.
There are three ways of entering the customer information :-
1. Selecting an existing customer
Clicking the Search button next to the customer field will allow a customer to be selected from the customer database - this includes all dealership customers as well as those entered from within the hire system. The customer details will then be displayed in the summary. If the customer has an account attached, the account no field will be automatically filled in with the account.
2. Select an Account
Selecting an account directly will select the account and fill in the details from the account details into the Summary field.
3. Type the customer details in
Typing a new customer into the boxes on the summary box will create a new customer record in the system. However, this customer is only available for future us in the Hire Rental System.
If required a vehicle can be allocated to the agreement - this can be done at any time before hiring the vehicle out and can be done by either typing in the vehicle registration directly into the Vehicle Reg box or by searching for a vehicle using the Search button next to the Vehicle Reg No box.
Once a date range is entered, and a hire group is the pricing of the agreement is displayed on window :-

The pricing of the rental can be adjusted at any time during the agreement by one of three methods :-
1. Changing the Plan Code
The hire system supports a number of Plans. In the rates table, there is a seperate set of rates per group of vehicle for each plan. It is therefore possible to create multiple rates (eg Retail, Corporate, Staff etc) as appropriate.
2. Overriding the rate manually
The hire tariff is displayed, with each rate shown on window. It is possible to overtype any of the prices and then click the "Calculate" button to recalculate the pricing.
3. Entering a percentage discount
Entering a percentage discount will discount the hire by this percent.
Collision Damage Waiver
CDW is added to the agreement by default unless the Customer Own Insurance box is ticked and the customer's own insurance details are typed in or selected on the Insurance Tab
Additional Options
It is possible to add additional options to the agreement (such as delivery charges, or items such as Baby Seats etc) by clicking the "Add" button and selecting an option from the list of options on the Rates Table. These can be configured to be a daily rate or a one-off charge per agreement :-
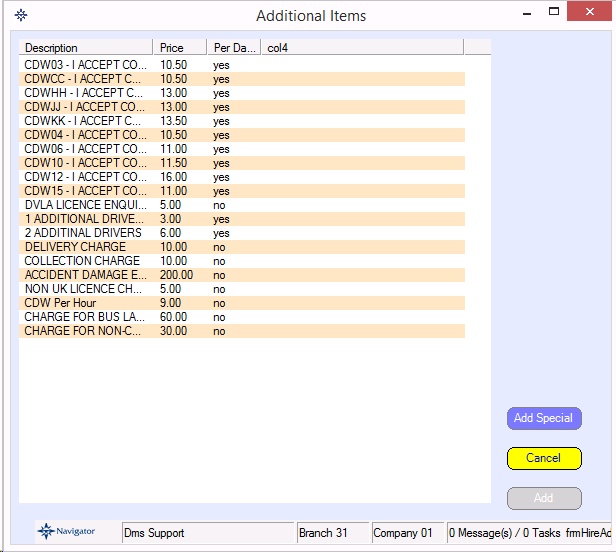
Selecting an option and clicking "Add" will then add it to the agreement. One-off free-text special options can be added by clicking the "Add Special" button.
Other Details on Hire Agreement
A customer's purchase order no can be entered, which will be printed on all invoices. Any special instructions can be entered, which will be printed on the Hire Agreement. If the vehicle is to be returned to a different branch, then this can be selected.
You will see at the bottom of the window there are other tabs. These tabs are the following:
Summary - Customer details and rental costs
Drivers - Driver details
Insurance - Insurance details
Payments - Payment details
Notes - General notes, etc.
History - Agreement history.
At the top of the window you have the following buttons:
Confirm Booking - Confirm the rental agreement
Hire - Mark the vehicle out for rental
Invoice - Invoice the rental agreement
Print Agreement - Print the agreement
Cancel Appointment - Cancel the rental
On creating an agreement, only three options are available :- Confirm Booking, which will confirm the booking. Cancel - which will cancel the agreement and Close. If Close is selected, then the system will prompt if you wish to confirm the booking - if not then the agreement is left as a quotation and can be confirmed later if required.
Once an agreement is confirmed, the availability is removed from the diary.